Preface

What is Aria2?

Aria2 is a free, cross-platform command line interface download manager that supports HTTP, HTTPS, FTP, Bittorrent and Metalink.

Another feature of Aria2 is that you can use JSON-RPC and XML-RPC for HTTP remote download control, and the JSON-RPC interface is available through WebSocket.

I mainly use to download seed Bittorrent files and multithreaded downloads.

Preparation before configuration

  • Installed Homebrew

  • Ability of using vim or other editors.

    Common commands:

    Press the i key in the open vim interface to enter edit mode; Press the Esc key to exit edit mode and enter command line mode; Use the :wq command to save and exit.

Install and configure Aria2

1
2
3
4
5
6
7
# Install aria2 by Homebrew
brew install aria2

# Create aria2.conf and aria2.session files
mkdir ~/.aria2 && cd ~/.aria2
touch aria2.conf
touch aria2.session

Edit the configuration file aria2.conf :

  1
  2
  3
  4
  5
  6
  7
  8
  9
 10
 11
 12
 13
 14
 15
 16
 17
 18
 19
 20
 21
 22
 23
 24
 25
 26
 27
 28
 29
 30
 31
 32
 33
 34
 35
 36
 37
 38
 39
 40
 41
 42
 43
 44
 45
 46
 47
 48
 49
 50
 51
 52
 53
 54
 55
 56
 57
 58
 59
 60
 61
 62
 63
 64
 65
 66
 67
 68
 69
 70
 71
 72
 73
 74
 75
 76
 77
 78
 79
 80
 81
 82
 83
 84
 85
 86
 87
 88
 89
 90
 91
 92
 93
 94
 95
 96
 97
 98
 99
100
101
102
103
104
105
106
107
108
109
110
111
112
113
114
115
116
117
118
119
120
121
122
123
124
125
126
127
128
129
130
131
132
133
134
135
136
137
138
139
140
141
142
143
144
145
146
147
148
149
## 文件保存相关 ##

# 文件的保存路径(可使用绝对路径或相对路径), 默认: Mac下Downloads下载文件夹
dir=${HOME}/Downloads
# 启用磁盘缓存, 0为禁用缓存, 1.16以上版本, 默认:16M
disk-cache=32M
# 文件预分配方式, 能有效降低磁盘碎片, 默认:prealloc
# 预分配所需时间: none < falloc ? trunc < prealloc
# falloc和trunc则需要文件系统和内核支持
# NTFS建议使用falloc, EXT3/4建议trunc, MAC 下需要注释此项
#file-allocation=none
# 断点续传
continue=true

## 下载连接相关 ##

# 最大同时下载任务数, 运行时可修改, 默认:5
#max-concurrent-downloads=5
# 同一服务器连接数, 添加时可指定, 默认:1, 最大值16
max-connection-per-server=5
# 最小文件分片大小, 添加时可指定, 取值范围1M -1024M, 默认:20M
# 假定size=10M, 文件为20MiB 则使用两个来源下载; 文件为15MiB 则使用一个来源下载
min-split-size=10M
# 单个任务最大线程数, 添加时可指定, 默认:5
#split=5
# 分片选择算法,有助于视频的边下边播同时兼顾减少建立连接的次数
stream-piece-selector=geom
# 整体下载速度限制, 运行时可修改, 默认:0
#max-overall-download-limit=0
# 单个任务下载速度限制, 默认:0
#max-download-limit=0
# 整体上传速度限制, 运行时可修改, 默认:0
#max-overall-upload-limit=0
# 单个任务上传速度限制, 默认:0
#max-upload-limit=0
# 禁用IPv6, 默认:false
#disable-ipv6=true
# 连接超时时间, 默认:60
#timeout=60
# 最大重试次数, 设置为0表示不限制重试次数, 默认:5
#max-tries=5
# 设置重试等待的秒数, 默认:0
#retry-wait=0

## 进度保存相关 ##

# 日志文件
log-level=notice
log=${HOME}/.aria2/aria2.log
# 从会话文件中读取下载任务
# 需提前创建一个空文件否则会报错
input-file=${HOME}/.aria2/aria2.session
# 在Aria2退出时保存`错误/未完成`的下载任务到会话文件
save-session=${HOME}/.aria2/aria2.session
# 定时保存会话, 0为退出时才保存, 1.16.1以上版本, 默认:0
save-session-interval=60

# 强制保存会话, 即使任务已经完成, 默认:false
# 较新的版本开启后会在任务完成后依然保留.aria2文件
#force-save=true

## RPC相关设置 ##

# 启用RPC, 默认:false
enable-rpc=true
# 允许所有来源, 默认:false
rpc-allow-origin-all=true
# 允许非外部访问, 默认:false
rpc-listen-all=true
# RPC监听端口, 端口被占用时可以修改, 默认:6800
rpc-listen-port=6800
# 设置的RPC授权令牌
# 此处使用`openssl rand -base64 32`命令生成<TOKEN>
# 此次需要自行配置,将<TOKEN>整体替换为你的RPC“密码”
rpc-secret=<TOKEN>
# 是否启用 RPC 服务的 SSL/TLS 加密,
# 启用加密后 RPC 服务需要使用 https 或者 wss 协议连接
#rpc-secure=true
#  RPC 服务中启用 SSL/TLS 加密时的证书文件,
# 使用 PEM 格式时,您必须通过 --rpc-private-key 指定私钥
#rpc-certificate=/path/to/certificate.pem
#  RPC 服务中启用 SSL/TLS 加密时的私钥文件
#rpc-private-key=/path/to/certificate.key

## HTTP 设置 ##

# 自定义 User Agent
user-agent=Mozilla/5.0 (Macintosh; Intel Mac OS X 10_15_1) AppleWebKit/537.36 (KHTML, like Gecko) Chrome/80.0.3987.85 Safari/537.36

## BT/PT下载相关 ##

# 当下载的是一个种子(以.torrent结尾)时, 自动开始BT任务, 默认:true
follow-torrent=true
# BT监听端口, 当端口被屏蔽时使用, 默认:6881-6999
listen-port=6881-6999
# 单个种子最大连接数, 默认:55
#bt-max-peers=55

### DHT 功能, 仅对 BT 生效, PT 无效###
# 打开 DHT (IPv4) 功能
enable-dht=true
# 打开 DHT (IPv6) 功能
enable-dht6=true
# DHT网络监听端口, 默认:6881-6999
dht-listen-port=6881-6999
# 本地节点查找
bt-enable-lpd=true
# 种子交换
enable-peer-exchange=true
# DHT (IPv4) 路由表文件路径
dht-file-path=${HOME}/.aria2/dht.dat
# DHT (IPv6) 路由表文件路径
dht-file-path6=${HOME}/.aria2/dht6.dat

# 客户端伪装, PT需要
peer-id-prefix=-UT341-
peer-agent=uTorrent/341(109279400)(30888)

# 同一服务器连接数
# 每个种子限速, 对少种的PT很有用, 默认:50K
#bt-request-peer-speed-limit=50K
# 当种子的分享率达到这个数时, 自动停止做种, 0为一直做种, 默认:1.0
seed-ratio=0
# BT校验相关, 默认:true
#bt-hash-check-seed=true
# 继续之前的BT任务时, 无需再次校验, 默认:false
bt-seed-unverified=true
# 保存磁力链接元数据为种子文件(.torrent文件), 默认:false
bt-save-metadata=true

# BT 服务器地址
# 逗号分隔的 BT 服务器地址. 如果服务器地址在 --bt-exclude-tracker 选项中, 其将不会生效.
bt-tracker=udp://tracker.coppersurfer.tk:6969/announce,udp://tracker.leechers-paradise.org:6969/announce,udp://tracker.opentrackr.org:1337/announce,udp://p4p.arenabg.com:1337/announce,udp://9.rarbg.to:2710/announce,udp://9.rarbg.me:2710/announce,udp://tracker.internetwarriors.net:1337/announce,udp://exodus.desync.com:6969/announce,udp://tracker.tiny-vps.com:6969/announce,udp://tracker.moeking.me:6969/announce,udp://retracker.lanta-net.ru:2710/announce,udp://open.stealth.si:80/announce,udp://open.demonii.si:1337/announce,udp://tracker.torrent.eu.org:451/announce,udp://tracker.cyberia.is:6969/announce,udp://denis.stalker.upeer.me:6969/announce,udp://tracker3.itzmx.com:6961/announce,udp://ipv4.tracker.harry.lu:80/announce,udp://valakas.rollo.dnsabr.com:2710/announce,udp://tracker.nyaa.uk:6969/announce,udp://retracker.netbynet.ru:2710/announce,udp://opentor.org:2710/announce,udp://explodie.org:6969/announce,http://explodie.org:6969/announce,udp://zephir.monocul.us:6969/announce,udp://xxxtor.com:2710/announce,udp://tracker.zum.bi:6969/announce,udp://tracker.yoshi210.com:6969/announce,udp://tracker.uw0.xyz:6969/announce,udp://tracker.sbsub.com:2710/announce,udp://tracker.lelux.fi:6969/announce,udp://tracker.iamhansen.xyz:2000/announce,udp://tracker.filemail.com:6969/announce,udp://tracker.dler.org:6969/announce,udp://retracker.sevstar.net:2710/announce,udp://retracker.akado-ural.ru:80/announce,udp://open.nyap2p.com:6969/announce,udp://chihaya.toss.li:9696/announce,udp://bt2.archive.org:6969/announce,udp://bt1.archive.org:6969/announce,udp://bt.okmp3.ru:2710/announce,https://tracker.nanoha.org:443/announce,http://tracker.torrentyorg.pl:80/announce,http://tracker.opentrackr.org:1337/announce,http://tracker.internetwarriors.net:1337/announce,http://tracker.bt4g.com:2095/announce,http://t.nyaatracker.com:80/announce,http://retracker.sevstar.net:2710/announce,http://pow7.com:80/announce,http://mail2.zelenaya.net:80/announce,http://h4.trakx.nibba.trade:80/announce,udp://tracker4.itzmx.com:2710/announce,udp://tracker2.itzmx.com:6961/announce,udp://tracker.zerobytes.xyz:1337/announce,udp://tracker.swateam.org.uk:2710/announce,udp://tr.bangumi.moe:6969/announce,udp://qg.lorzl.gq:2710/announce,udp://opentracker.i2p.rocks:6969/announce,udp://bt2.54new.com:8080/announce,https://tracker.opentracker.se:443/announce,https://tracker.lelux.fi:443/announce,http://www.loushao.net:8080/announce,http://vps02.net.orel.ru:80/announce,http://tracker4.itzmx.com:2710/announce,http://tracker3.itzmx.com:6961/announce,http://tracker2.itzmx.com:6961/announce,http://tracker1.itzmx.com:8080/announce,http://tracker01.loveapp.com:6789/announce,http://tracker.zerobytes.xyz:1337/announce,http://tracker.yoshi210.com:6969/announce,http://tracker.nyap2p.com:8080/announce,http://tracker.lelux.fi:80/announce,http://tracker.bz:80/announce,http://opentracker.i2p.rocks:6969/announce,http://open.acgnxtracker.com:80/announce
# BT 排除服务器地址
bt-exclude-tracker=

# 启用后台进程
daemon=false

# 部分事件hook, 调用第三方命令:/path/to/command
# BT下载完成(如有做种将包含做种,如需调用请务必确定设定完成做种条件)
on-bt-download-complete=${HOME}/.aria2/download-complete-hook.sh
# 下载完成
on-download-complete=${HOME}/.aria2/download-complete-hook.sh
# 下载错误
on-download-error=

# 代理 仅支持 HTTP 协议
#all-proxy=http://127.0.0.1:1087

Considerations for this profile are as follows:

  • RPC mode is enabled by default.
  • The RPC authorization token has been set, please change it to your own.
  • BT tracker has been added.

Set to self-boot

Create a user’s startup file

1
2
touch ~/Library/LaunchAgents/aria2.plist
vim ~/Library/LaunchAgents/aria2.plist

Write as follows:

 1
 2
 3
 4
 5
 6
 7
 8
 9
10
11
12
13
14
15
16
17
18
<?xml version="1.0" encoding="UTF-8"?>
<!DOCTYPE plist PUBLIC "-//Apple//DTD PLIST 1.0//EN" "http://www.apple.com/DTDs/PropertyList-1.0.dtd">
<plist version="1.0">
<dict>
    <key>KeepAlive</key>
    <true/>
    <key>Label</key>
    <string>aria2</string>
    <key>ProgramArguments</key>
    <array>
        <string>/usr/local/bin/aria2c</string>
    </array>
    <key>RunAtLoad</key>
    <true/>
    <key>WorkingDirectory</key>
    <string>/Users/YOUR-OWN-USERNAME/Downloads</string>
</dict>
</plist>

Note:

Be sure to change the user name of the WorkingDirectory directory to your own user name.

1
2
3
4
5
# Check plist files
plutil ~/Library/LaunchAgents/aria2.plist

# Chmod file
chmod 644 ~/Library/LaunchAgents/aria2.plist

Add and enable self-startup files

 1
 2
 3
 4
 5
 6
 7
 8
 9
10
11
# Add
launchctl load ~/Library/LaunchAgents/aria2.plist

# Delete
launchctl unload ~/Library/LaunchAgents/aria2.plist

# Start
launchctl start aria2

# Stop
launchctl stop aria2

Note:

If you have previously added aria2 startup files, remember to delete the startup items and then add them again!

Add automatic update BT tracker function

Create a trackers-list-aria2.sh script

1
2
touch ~/.aria2/trackers-list-aria2.sh
vim ~/.aria2/trackers-list-aria2.sh

The script reads as follows:

 1
 2
 3
 4
 5
 6
 7
 8
 9
10
11
12
13
14
15
16
17
18
19
20
21
22
23
24
#!/bin/bash
# 文件名 trackers-list-aria2.sh
# aria2 设置文件路径
CONF=${HOME}/.aria2/aria2.conf

# 设置选择的 trackerlist (可选 all_aria2.txt, best_aria2.txt, http_aria2.txt)
trackerfile=all_aria2.txt
# downloadfile=https://raw.githubusercontent.com/ngosang/trackerslist/master/${trackerfile}
downloadfile=https://trackerslist.com/${trackerfile}

list=$(curl -fsSL ${downloadfile})
if ! grep -q "bt-tracker" "${CONF}" ; then
    echo -e "\033[34m==> 添加 bt-tracker 服务器信息......\033[0m"
    echo -e "\nbt-tracker=${list}" >> "${CONF}"
else
    echo -e "\033[34m==> 更新 bt-tracker 服务器信息.....\033[0m"
    sed -i '' "s@bt-tracker.*@bt-tracker=${list}@g" "${CONF}"
fi

## 重启 aria2 服务
echo -e "\033[34m==> 停止 aria2 服务......\033[0m"
launchctl stop aria2
echo -e "\033[34m==> 启动 aria2 服务......\033[0m"
launchctl start aria2

Set permissions:

1
chmod +x ~/.aria2/trackers-list-aria2.sh

Set up the task scheduler to achieve automatic updates

Compile the current user task plan:

1
crontab -e

Use crontab -l command to view the current user task schedule. The contents are as follows:

1
2
MAILTO = ""
0 18 * * * ~/.aria2/trackers-list-aria2.sh

2022/05/27 update:

Add MAILTO = “” configuration to avoid You have new mail prompts.

If such notification has already occurred, enter mail to view and eliminate it.

Or you can command directly:

1
(crontab -l 2&> /dev/null; echo "0 18 * * * ~/.aria2/trackers-list-aria2.sh") | crontab

The above indicates:

Automatically update BT tracker and restart aria2 service at 6: 00 p.m. every day.

Cancel the scheduled task:

1
crontab -e

Then delete the content manually, or run it directly:

1
crontab -l 2&> /dev/null| sed "/trackers-list-aria2.sh/d" | crontab

Add Download-Notification

Final effect: when the download is complete, a prompt box will pop up in the upper right corner of the screen to display the file name of the completed download, and voice broadcast: “there is a file that has been downloaded, please check it!”

 An example of aria2 prompt box under macOS

Create a download-complete-hook.sh script

1
2
touch ~/.aria2/download-complete-hook.sh
vim ~/.aria2/download-complete-hook.sh

The script reads as follows:

 1
 2
 3
 4
 5
 6
 7
 8
 9
10
11
12
#!/bin/sh
# 文件名 download-complete-hook.sh
# 给aria2 RPC添加一个下载完成通知 for macOS
# 变量 3 表示下载完成文件的路径
# 具体提示框设置可参考`https://code-maven.com/display-notification-from-the-mac-command-line`。
# 不支持设置自定义图标

fname=`basename $3`
osascript <<EOF
display notification "$fname 已经下载完成!" with title "【下载完成】"
say "有个文件下载完成,请查收!"
EOF

Set permissions:

1
chmod +x ~/.aria2/download-complete-hook.sh

Add Hook Settings

The aria2.conf configuration file above already contains the following, and those who use the above file can skip this section directly.

Add the following to the aria2.conf :

1
2
3
4
# BT下载完成(如有做种将包含做种,如需调用请务必确定设定完成做种条件)
on-bt-download-complete=${HOME}/.aria2/download-complete-hook.sh
# 下载完成
on-download-complete=${HOME}/.aria2/download-complete-hook.sh

Aria2 web UI

Do not need to install, just use the browser to open: AriaNg UI .
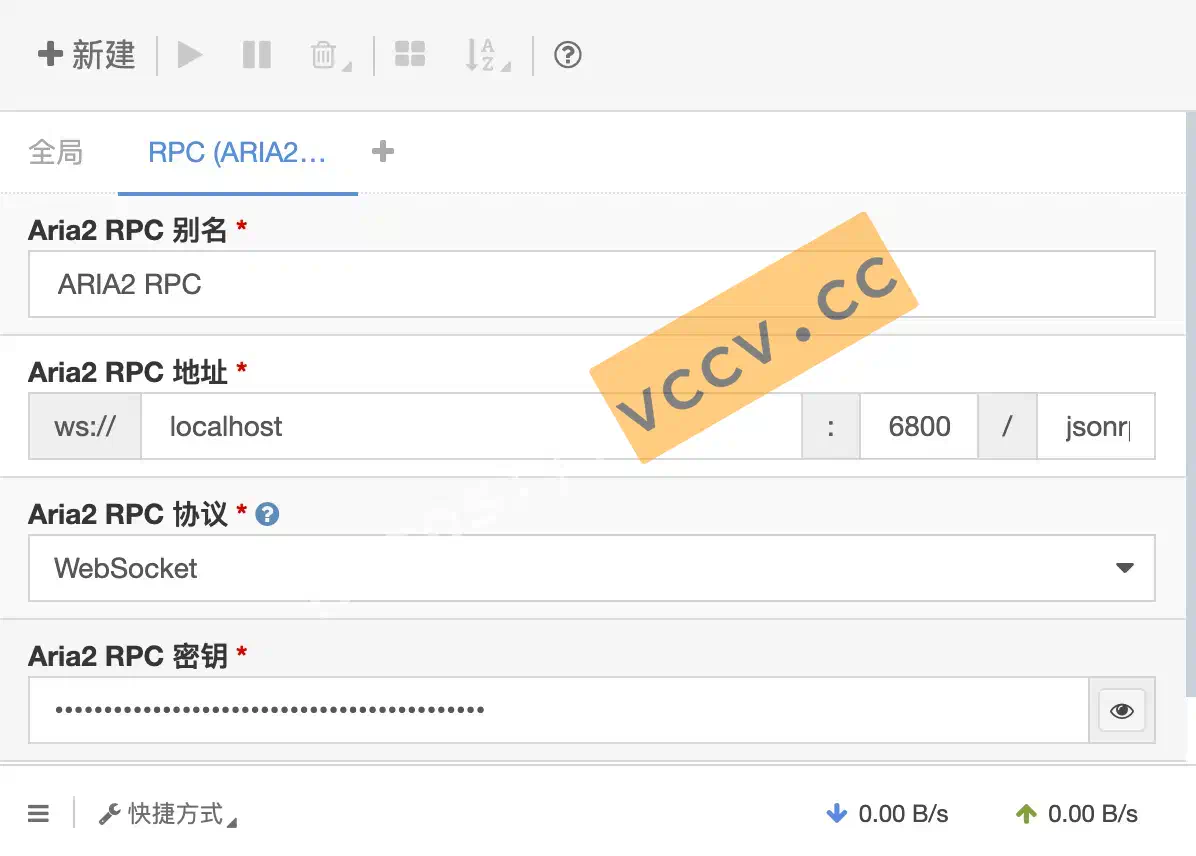
PRC Setting

Set according to the PRC-related settings in the aria2.conf configuration file.

 AriaNg PRC Setting

Install the browser download plug-in

Aria2 for Chrome plug-in

  • Built-in an offline AriaNg version of UI
  • Integrate right-click download menu

The built-in offline AriaNg version also requires PRC Setting , otherwise you will not be able to connect successfully.

Reference only

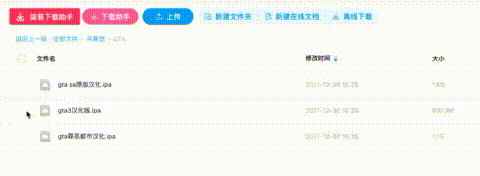
Download the file from the network disk

网盘直链下载助手: it needs to be enabled by installing script managers such as the extension plug-in Violentmonkey or Tampermonkey .

Usage

Use with Aria2 for Chrome Plugin-in .

  1. Select the file you want to download and click “Aria download” or “RPC download” on the download assistant page to push it to the Aria2 UI interface.
  2. After clicking the appropriate option with the mouse, select “send Link”, and then confirm the download.

 Plug-in usage example

Thanks

GitHub maboloshi